Saturday 29 January 2011

StoryBoarding for Heroes 1.0

Kofi recently asked me if I could complete some storyboards for Heroes 1.0. so that he could create an Animatic for the formative assessment. Obviously with my Artistic folder being void f any storyboards, I jumped at the opportunity.

Kofi wanted each board as an individual file, so as to make it easier for him to composite them for the animatic. This however leaves me with 50 odd separate images, and a life time of uploading should i choose to post them all. Instead I'll see if i can grab a link for the Animatic.


The images posted are just a few frames of the animatic, and are really quite rough. However, I really liked the outcome and would like to thank Kofi for the opportunity to improve and expand my Artistic Folder.

Friday 28 January 2011

Update


With another formative lurking, it was time to create some concepts for the Raven Project introduction. After further talks with Sophie, we wanted the first shot to involve a fly through of a 1600's london, set at the time of the decree mentioned in the introduction.

Abover are some quick illustrations of King Charles I and Elizabeth I. Charles is mentioned due to him actually finalising the decree, that 6 Ravens should stay at the tower. Lizzie however will be used for the portrait shot.
A concept of the Millennium Bridge or the now 16th century bridge on South Bank.
St Pauls and the globe theatre.
The Savoy, chosen to represent for the strand, and a 16th century Taxi.
...And finally the London Eye and Gherkin.

I like these concepts, one of my main goals was to keep the building recognizable, yet still stylised and old obviously. In the 16th century everything was mainly crafted with wood, I do however worry that if we change the colour of the eye, it ma just look like a ferris wheel. I shall put it to the group and see what they think.

Monday 24 January 2011

Another Heroes Concept

After a week of trial and error, I finally came up with this design. I really liked the outcome, simple with a classic disney-eque style, in my opinion he looks like a solid 5 yr old. Kofi agreed, and really liked the button up PJ's as they look outstandingly juvenile. I am happy with the concept, though I think I could have taken it further with a little more time, sadly modeling needed to begin and I was cut short.

Tuesday 18 January 2011

Heroes 1.0


Kofi came to me and asked that I complete some character concepts for his short Heroes 1.0. Unfortunately he didn't have a lot of time as his previous concept wasn't fitting the style he wanted for his film. Without this time, I wasn't really able to complete any decent concepts, and instead jumped straight into a final design, something that I really dislike doing.

EDIT: Kofi unfortunately didn't like the concept, although he thought it was closer to the style that he wanted, the boy looked too old. He has given me another week to try my hand at another design.

Friday 14 January 2011

Moar work for the Ravens.

As you are aware, i mentioned briefly that I was completing the introduction to the Raven Project. Here is a brief animatic of the Idea that I had.


Sophie liked the Idea and told me to run with it. Although she wants something done with the ending, a small animation of Charles 1 or the Ravens.

EDIT: Sophie threw some audio on the file for me, So I've updated the video.

Wednesday 12 January 2011

Raven Model Turn Around

I created a brief turnaround for my showreel. I'm still really happy with the results. Previously I created turnarounds by setting up a camera in maya and animating a rotation on the character. This time I did it by creating a nurbs circle and parenting the camera to it. I then animated the circle for a perfect 360.

Tuesday 11 January 2011

Raven Complete


Finally finished the feathers, and quickly added some proper materials to them, in an attempt to see how realistic I could make them using basic Maya materials. I played around with a Blinn changing the reflectivity and ambient colours and got this (quite wonderful, in my opinion) look.

EDIT: Sadly Sophie has decided to go along with Clym's Model as it seems the rig he was working on will not fit my model and is beyond editing. I am still however glad for the oppurtunity and for the addition to my Modeling portfolio.

Monday 10 January 2011

Feathers Round three

So after completeing the feather method on the wings, it was time to try it out on the body.
I started by creating a row of 5 feathers and then using the animation technique provided by Daffy in the previous videos. It seemed to work alright, however a lot more key framing was involved in order to stop the feathers breaking into each other and the base mesh.
As you can see, there is some over lapping happening, but I have to admit, I'm still quite happy with the result.
Now to move on to the more complex part of the head. I'm not going to lie, even with the animation cheat, this was still tricky and the mesh on top is actually quite complex and getting the feathers to look as if they are sitting smoothly on top of the head has been quite tricky. Though I think this part may be unavoidable and I realise however tricky, the results for this method are completely satisfying.
I think I shall be continuing with this method to create my bird for the Raven Project, as the final outcome looks quite realistic. Along with textures I fail to see why this model couldn't look photo realistic.

I am very glad we had the chance to research our hurdles before we came to them, this means that I can go ahead confidently with the model and know that there is a way to achieve the outcome that I and the others want.

Feathers Round two

So I have tested the feather method provided by Daffy in the videos posted previously. The method works exceedingly well on the wings and the Animation cheat works nicely here. However I still have reservations when it comes to the rest of the body, but only time will tell.
The reference sheet was also helpful, especially the included diagrams of the different parts of the wings.
As you can see I have colour coded different areas, so that they will be easier to texture and incorperate into the rig. However He's starting to look like a Rainbow Raven.
Continuing using the same method for different parts of the wing. Still working Nicely, seems like it may be a full proof method for creating feathers.
And finally a finished wing. Seems that this method works quite nice, so now to try it on the body. I really like the effect this method give in renders, and now i'm really starting to see the light at the end of the tunnel with this model.

Feathers Round One

Before I start with the feathers, Daffy in his video showed us a reference page he had put together outlining all the bits and pieces he had collected about ducks. In those images he had references and diagrams as to where the feather should be and how they are placed. I have tried to do the same thing and here is the result.

Daffy Duck pt 2

Sophie managed to get us some footage from her meet with daffy. It's a very nice insight and gives us more ground to work towards, especially in creating the feathers. Unfortunately there isn't a cheat where I can apply some Maya hair and have lovely feathers, I have to create them using polygon planes and place them on the model.


It's really inspiring stuff, and the finished effect with all the trippy render layers included is absolutely beautiful. There are also those incredible cheats using animation to adjust the feathers and place them for you, which makes me feel so much better about making them individually. So now theres nothing left to do, but stop avoiding it, and getting on with it.

Snow = Fail

There has been a sudden turn in the weather and I am stuck in Swanley with 2 1/2 foot of snow. Sadly this means trains or buses are not running through my area and I cannot make the meet with Daffy.

Edit

Clym is also stuck in Sidcup, however Sophie shall be going ahead to the meet with Daffy.

Daffy Duck

Feathers.

Yes feathers, I have put off researching the how-to's on Maya as I know that this is going to be the real test when creating this model.

I found this thread on CG talk which discussed the subject and some possible answers.

I also found this tutorial, which unfortunately went straight over my head.

LUCKILY Sophie and her inside industry knowledge/contacts has set up a meeting with her friend Daffy. Daffy has worked on an advertisement which included a number of CGI photo realistic birds, and can tell us how the models were achieved. Myself, Sophie and Clym shall be attending the meet, and I'm hoping he will be able to stop my head spinning.

SUCCESS!!!

The secret was all in the specular mapping. By adjusting and creating a specular map on the Iris, i was able to edit how light reacts to the Iris and bring back some of the warmth to the eye AND make it beam even more.
As you can see, now the eye really pops out of the model, and the brightness adds in my opinion quite a cheeky side to the model.
A mid-shot including the eye, and below the wire frame for the eye. You can see the shape of the nurb sphere eyeball, including the Iris, the highlighted shape is the pupil.
I am very happy with the outcome from this tutorial, and I am so glad it went on to cover specular mapping. I feel like I have learnt quite a bit about textures and the hypershade editor in maya because of it.

Eyes finished.

After completing the Iris texture, Screen cap above. I could move on with the tutorial and planar map the Iris and apply the texture. The results are below, and I have to admit that i was pretty upset that the render/maya and kind of washed out the texture. I was aiming for beaming eyes, somewhat owl like.
The Eye on it's own.
The eye placed in the model.
The tutorial then goes on the show you how to add a pupil, which is nice as my renders keep showing the back wall of the eye ball and it looks odd. I will now have to play about with the Iris settings I think and see what I can achieve. Hopefully I can bring back some of the warm in the eye.

EYES!!!

The Eye tutorial featured on the Gnomon Website is seems to be pretty good. I can't believe I havn't seen it before. Though it takes a while, the finish is stunning and there is a depth to the model that cannot be achieved through a simple texture. Also the tutorial offers the chance of Pupil Dilation animation as the Iris is formed from a torus which can be changed in shape.
The tutorial basically takes you through creating a realistic eye using a Nurb sphere. You have to edit the sphere using Isopalms to give it the realistic bulge at the front of the eye. It then talks you through editing the materials to create a lovely wet shine to the eyeball, and using transparency mapping so that you can make the Iris torus below, visible.
As I am creating the eye for a Raven however, I had to deviate a tiny bit from the tutorial, instead looking at the formation of a birds eye. There weren't too many differences, mainly just the size and coverage of the eye by the Iris. All that had to be adjusted were the size of the torus and it's placement. I also had to adjust the transparency map, just a little.
Though It is not yet finished, I am pretty happy with the results. I am now working on a texture for the Iris, so that I may continue with the tutorial. Sneak peak below.


The Raven Needs EYES!!!

Eyes are the most important part of a character, and as this is a Photo realistic bird, the eyes cannot sit looking dead on it's face. I need to cruise around the internet looking for a descent tutorial for eyes.

*EDIT*

Got directed to http://www.thegnomonworkshop.com

There is a lovely Eye tutorial in the free section. Going to play now.

Zbrush Sculpting

My First EVER Zbrush sculpt is going well! I'm very much enjoying the software. It's easy to use and very intuitive.
I now realize why some many modelers use Zbrush, it's breathe taking. The subdivision tool is so much nicer to use than Maya's Smooth.
I'm pleased with the results of the ZBrush model, I am especially pleased with the face and can definitely see my model coming together.

Final Concept Unhatched & Maya Base Mesh

Whoop! Today I finished the final concepts for the Unhatched Project, I showed them to Tom & Guy and they loved them. They said the colour scheme was good and they loved the face.
I changed the face slightly, making the basic shapes to the head, eyes and beak slightly more realistic, whilst keeping the huge cartoon eyes and humanistic iris and pupil. The colours were a slight challenge, I loosely followed the scheme of a blue tit, whilst simplifying it. I also thought about making the colours lighter, brighter and more appealing to children. Tom & Guy approved and below is a shaded version. I used a purple tone shade, as it is soft and worked well with the colours. This is possibly something the guys might want to consider with the incandescence of the model.
Finally, before I can move on to Zbrushing the model for the Raven Project, I have to have a base mesh to work with, So I knocked this out in Maya. It's a really basic mesh, but I was trying to get the proportions of the limbs and body etc right before I took it into ZBrush.

Raven Reference

Sophie found and made us some lovely reference images for the Raven Model. We decided to change the eye colour of the raven from black to a brownish orange, so to give the bird a bit more character.
The great thing about these reference images are that they are in the sort of pose i would have thought of modeling our ravens. The only difference being I would have the wings extended. The bad thing about these references are that they lack proper images for the wings.

UnHatched Concepts & ZBRUSH Tutorials found.

So I knocked up some concepts for the Unhatched movie a while back. I showed them to Tom & Guy whom liked them very much. I told them to look them over and give me some info to continue with.
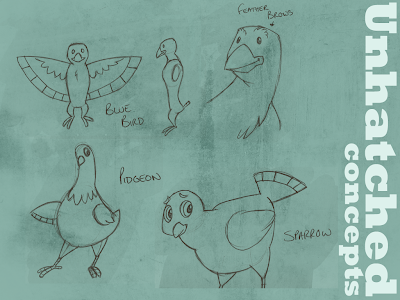
The above images were me taking a more simple cartoon approach to the character of the mother bird. I wanted to go with big eyes as they are very expressive and if i couldn't have them, there needed to be eyebrows. The below image is my taking of a more realistic approach, this is personally my favourite, however as much as tom like the image, I don't think he wanted to take it in the direction of an owl.
These were my playing with other bird species but as mentioned above, Tom wanted to keep the bird simple and stick with a more common breed, so as not to distract from the story.
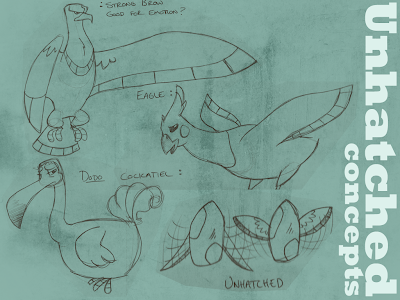
In the end, tom suggested following up the Sparrow sketch, as it was simple and fitted the style he wanted to go with. He told me to look at including some colour, and Guy wanted some blues and yellows to appear in the scheme. So with this information, I can go forward with the design prosess.
Sometimes I have to take a step back and laugh at my own stupidity, I was literally at breaking point searching and finding slightly out of date tutorials for ZBrush. They were either for earlier versions of the software (which made them almost useless as the interface has changed quite a bit with this version), or the type of tutorial that doesn't really talk a beginner through the basics.

AND THEN

Well of course, I didn't actually occur to me check out the Pixologic website. I assumed that the producers of such a beautiful piece of software would make you subscribe and register your software and make you pay billions before they let you in on any of the softwares secrets. However, I was wrong, so, so, so wrong.

http://www.pixologic.com/zclassroom/homeroom/

The above link proved me and all my misconceptions wrong. There are some lovely tutorials on the website, for beginners and beyond. Showing you how to use certain tools. It was a lovely eye opener to the software and talks you through the many different ways in which you can model using zbrush.